> ## Documentation Index
> Fetch the complete documentation index at: https://densify-sync-changelog-7.mintlify.site/llms.txt
> Use this file to discover all available pages before exploring further.

# Node Tree Viewer

export const InlineImageWithText = ({src, href, children, width = 80, caption}) => {
  return <span className="inline-flex items-center gap-3 align-middle">
            <a href={href} className="inline-block border-b-0">
                <Frame caption={caption}>
                    <img src={src} alt="" className="object-contain align-middle " width={width} style={{
    minWidth: width
  }} />
                </Frame>
            </a>
            <span className="align-middle">{children}</span>
        </span>;
};

The node tree viewer offers an intuitive and efficient way to navigate and explore your node groups. Nodes and Node Groups Node that have been discovered in the last day are displayed in the tree viewer,

<Frame caption="Figure: Locating the Node Tree Viewer">
  <img src="https://mintcdn.com/densify-sync-changelog-7/vcj5vHcBHjaq78jh/images/docs-kubex/Content/Kubex/03000129_705x348.png?fit=max&auto=format&n=vcj5vHcBHjaq78jh&q=85&s=9fd90d04ae2896e2b81d87db13ca94c9" alt="" width="1119" height="544" data-path="images/docs-kubex/Content/Kubex/03000129_705x348.png" />
</Frame>

<InlineImageWithText href="#" src="/images/docs-kubex/Content/Kubex/03000004.png">
  Use the <a href="/docs-kubex/Content/Kubex/Using_the_Tree_Viewer">container tree viewer</a> to navigate your container environment.
</InlineImageWithText>

Use the tree viewer to select the scope of nodes on which to report. As you navigate through the tree, the reports on the right update automatically to show the selected scope.

### Views and Filters

The default view is your container hierarchy i.e. Clusters > Node Groups > Individual Nodes. These views can be customized to better manage your data. See [Creating Views from a Table](#creating-from-table).

<Frame caption="Figure: Selecting View and Filter Options for the Tree View">
  <img src="https://mintcdn.com/densify-sync-changelog-7/vcj5vHcBHjaq78jh/images/docs-kubex/Content/Kubex/03000091_295x101.png?fit=max&auto=format&n=vcj5vHcBHjaq78jh&q=85&s=0cc0acb65f4c6eeca10662c64e512aa2" alt="" width="295" height="101" data-path="images/docs-kubex/Content/Kubex/03000091_295x101.png" />
</Frame>

### Counts

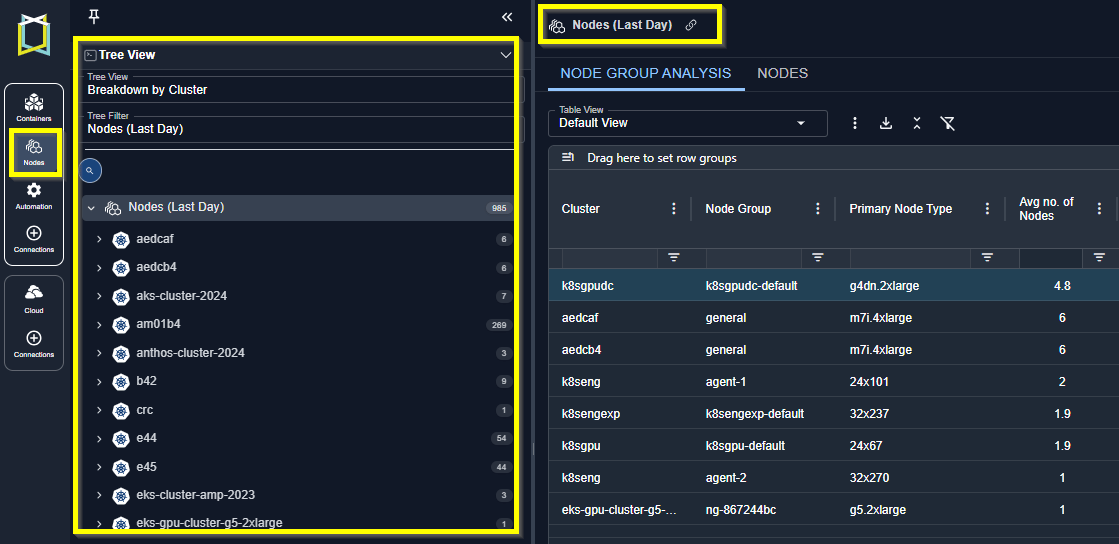
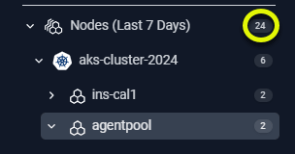
You can see a count of the number of nodes at each branch of the tree viewer.

<Frame caption="Figure: Node Counts">
  <img src="https://mintcdn.com/densify-sync-changelog-7/3W3reGPVAi6XtMaP/images/docs-kubex/Content/Kubex/03000152_295x154.png?fit=max&auto=format&n=3W3reGPVAi6XtMaP&q=85&s=18addf20b8ab1a5cfcbcdbd34d0e902c" alt="" width="295" height="154" data-path="images/docs-kubex/Content/Kubex/03000152_295x154.png" />
</Frame>

### Navigating the Tree Viewer

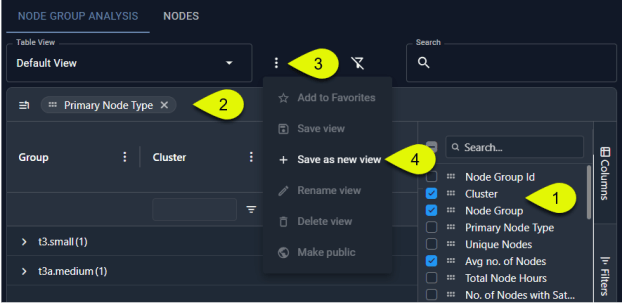
The following icons are available, by default. You can create custom views based on other attributes that may not include any of the following items.

<Accordion title="Table: Tree Viewer Icons">
  <table style={{ width: '100%' }}>
    <thead>
      <tr>
        <th scope="col" style={{ width: '15%', verticalAlign: 'middle' }}>
          <p>Icon</p>
        </th>

        <th scope="col" style={{ width: '25%', verticalAlign: 'middle' }}>
          <p>Entity</p>
        </th>

        <th scope="col" style={{ width: '60%', verticalAlign: 'middle' }}>
          <p>Description</p>
        </th>
      </tr>
    </thead>

    <tbody>
      <tr>
        <td style={{ textAlign: 'center', verticalAlign: 'middle' }}>
          <img src="https://mintcdn.com/densify-sync-changelog-7/vcj5vHcBHjaq78jh/images/docs-kubex/Content/Kubex/03000092.png?fit=max&auto=format&n=vcj5vHcBHjaq78jh&q=85&s=51f5149f16a6966b25874710b5d6ff18" alt="All Nodes icon" width="55" height="58" data-path="images/docs-kubex/Content/Kubex/03000092.png" />
        </td>

        <td style={{ verticalAlign: 'middle' }}>
          <p>All Nodes</p>
        </td>

        <td style={{ verticalAlign: 'middle' }}>
          <p>The top level entity that shows your infrastructure.</p>
        </td>
      </tr>

      <tr>
        <td style={{ textAlign: 'center', verticalAlign: 'middle' }}>
          <img src="https://mintcdn.com/densify-sync-changelog-7/vcj5vHcBHjaq78jh/images/docs-kubex/Content/Kubex/03000005.png?fit=max&auto=format&n=vcj5vHcBHjaq78jh&q=85&s=afa0d6ba0b0013dbbab9f0c6f46cc05e" alt="Kubernetes Cluster icon" width="55" height="58" data-path="images/docs-kubex/Content/Kubex/03000005.png" />
        </td>

        <td style={{ verticalAlign: 'middle' }}>
          <p>Kubernetes Cluster</p>
        </td>

        <td style={{ verticalAlign: 'middle' }}>
          <p>This represents a Kubernetes cluster that contains the node or group of nodes that manage, deploy, and scale your applications.</p>
        </td>
      </tr>

      <tr>
        <td style={{ textAlign: 'center', verticalAlign: 'middle' }}>
          <img src="https://mintcdn.com/densify-sync-changelog-7/vcj5vHcBHjaq78jh/images/docs-kubex/Content/Kubex/03000094.png?fit=max&auto=format&n=vcj5vHcBHjaq78jh&q=85&s=16ea834e84eb71de77b85d27610a5da3" alt="Node Group icon" width="55" height="58" data-path="images/docs-kubex/Content/Kubex/03000094.png" />
        </td>

        <td style={{ verticalAlign: 'middle' }}>
          <p>Node Group</p>
        </td>

        <td style={{ verticalAlign: 'middle' }}>
          <p>This represents one node group.</p>
        </td>
      </tr>

      <tr>
        <td style={{ textAlign: 'center', verticalAlign: 'middle' }}>
          <img src="https://mintcdn.com/densify-sync-changelog-7/vcj5vHcBHjaq78jh/images/docs-kubex/Content/Kubex/03000093.png?fit=max&auto=format&n=vcj5vHcBHjaq78jh&q=85&s=2d10afe49c3b840bf16f80e9a644a9c7" alt="Node icon" width="55" height="58" data-path="images/docs-kubex/Content/Kubex/03000093.png" />
        </td>

        <td style={{ verticalAlign: 'middle' }}>
          <p>Node</p>
        </td>

        <td style={{ verticalAlign: 'middle' }}>
          <p>This represents a single node.</p>
        </td>
      </tr>

      <tr>
        <td style={{ textAlign: 'center', verticalAlign: 'middle' }}>
          <img src="https://mintcdn.com/densify-sync-changelog-7/vcj5vHcBHjaq78jh/images/docs-kubex/Content/Kubex/03000084.png?fit=max&auto=format&n=vcj5vHcBHjaq78jh&q=85&s=bfcb585833143e07f858e97d47ac46f8" alt="Other Grouping icon" width="55" height="58" data-path="images/docs-kubex/Content/Kubex/03000084.png" />
        </td>

        <td style={{ verticalAlign: 'middle' }}>
          <p>Other Grouping</p>
        </td>

        <td style={{ verticalAlign: 'middle' }}>
          <p>Represents other attributes or labels that have been used to group the data.</p>
        </td>
      </tr>
    </tbody>
  </table>
</Accordion>

## Using Tabs to View the Selected Systems

Based on your selection in the tree viewer various tabs are displayed to view the selected data. When multiple systems are selected you see:

<ul>
  <li>
    <a href="/docs-kubex/Content/Kubex/Node_Group_Analysis">
      Node Groups
    </a>

    \--Shows you the selected scope in a tabular view. Three views are provided and you can create customized views by selecting only the required columns and saving the results
  </li>

  <li>
    <a href="/docs-kubex/Content/Kubex/Nodes_Tab">
      Nodes
    </a>

    \--Shows you the details of individual nodes. Again, the content of the report is based on your selection in the tree viewer.
  </li>
</ul>

When a single node is selected you see:

<ul>
  <li>
    <a href="/docs-kubex/Content/Kubex/Overview_Tab">
      Overview
    </a>

    \--Shows you the utilization and recommendation details for a single node.
  </li>

  <li>
    <a href="/docs-kubex/Content/Kubex/GPU_Tab">
      GPU
    </a>

    \--Shows you the GPU resource allocation and utilization details for a single node with configured GPU resources.
  </li>
</ul>

## Creating Views from a Table

You can also create a view directly from the table, using the columns to define your view:

<ol start="1">
  <li>Select the columns to be added and/or removed.</li>
  <li>Drag any column to the header bar to group the data by the selected item.</li>
  <li>Once the data is organized to meet your requirements, open the context menu.</li>
  <li>Click **+Save as new view** and enter a name for your view.</li>
</ol>

<Frame caption="Figure: Manage Views Context Menu">
  <img src="https://mintcdn.com/densify-sync-changelog-7/vcj5vHcBHjaq78jh/images/docs-kubex/Content/Kubex/03000102_622x303.png?fit=max&auto=format&n=vcj5vHcBHjaq78jh&q=85&s=6bae3be3fb9730fa477238c0f685f15e" alt="" width="622" height="303" data-path="images/docs-kubex/Content/Kubex/03000102_622x303.png" />
</Frame>

#### Video Resources

<AccordionGroup>
  <Accordion title="Searching for a System">
    <iframe frameborder="0" height="310" src="https://player.vimeo.com/video/1044765242?badge=0&autopause=0&player_id=0&app_id=58479" width="550" />

    <a href="https://player.vimeo.com/video/1044765242?badge=0&autopause=0&player_id=0&app_id=58479" target="_blank">Searching for a System</a>
  </Accordion>

  <Accordion title="Using the Tree Viewer">
    <iframe frameborder="0" height="310" src="https://player.vimeo.com/video/1038945637?title=0&byline=0&portrait=0&badge=0&autopause=0&player_id=0&app_id=58479" width="550" />

    <a href="https://player.vimeo.com/video/1038945637?title=0&byline=0&portrait=0&badge=0&autopause=0&player_id=0&app_id=58479" target="_blank">Using the Tree Viewer</a>
  </Accordion>
</AccordionGroup>
